Lightroom Editing Style: 7 Powerful Steps to Create Your Signature Look
In a world overflowing with beautiful imagery, what makes your photos distinctly yours? It’s not just the gear you use, the places you shoot, or the moments you capture. What truly sets your work apart is your Lightroom editing style — the signature aesthetic that makes someone instantly recognize your photo in a scrolling feed.
Whether you’re a portrait artist, a wedding storyteller, a travel photographer, or a content creator, a well-defined Lightroom editing style isn’t just about visuals — it’s about building a brand. When done right, it communicates your personality, evokes emotion, and attracts clients who align with your creative energy.
Let’s dive into 7 powerful steps to help you shape and refine a Lightroom editing style that feels true to you and consistent across every frame.
1. Define Your Visual Identity
Before touching a single slider, take a step back and ask yourself:
What emotions do I want my photos to convey?
Are my edits inspired by film, editorial, nature, or modern minimalism?
Do I love soft, pastel tones — or deep shadows and high contrast?
Am I drawn to warm vintage vibes, clean whites, or bold color pops?
Your answers form the foundation of your Lightroom editing style and creative identity.
🎯 Pro Tip: Create a Pinterest mood board or save Instagram posts that reflect the tones, moods, and aesthetics you love. Patterns will emerge — and that becomes your creative compass.
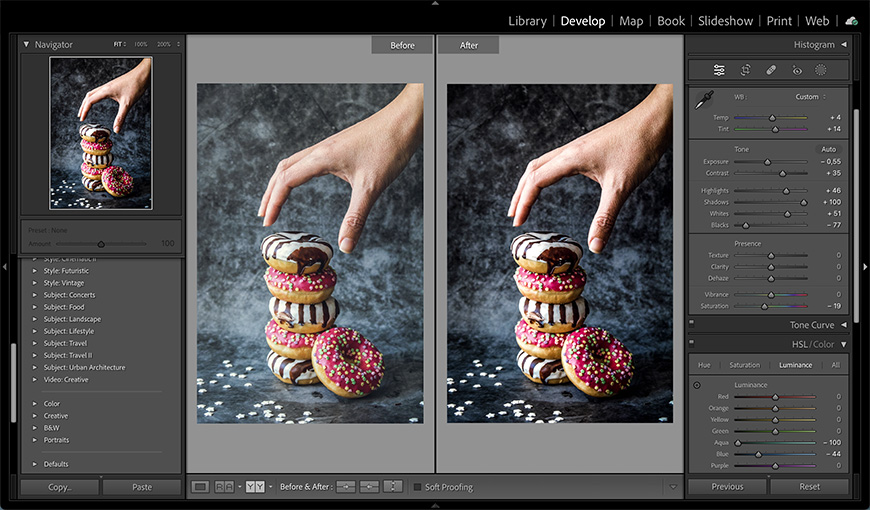
2. Set the Tone Using the Basic Panel
The Basic Panel in Lightroom is where your edit begins to take shape. Here, you define the overall mood through global adjustments:
White Balance: A cool tint adds drama and mystery, while warmer tones create softness and romance.
Exposure & Contrast: Set the brightness level and balance light across the image. Add or reduce contrast depending on your style.
Shadows & Highlights: Recover lost detail in high-contrast scenes or add dimension to flat lighting.
Clarity, Texture & Dehaze: These sliders sculpt the feel — crisp and edgy, or smooth and dreamy.
Don’t be afraid to experiment here. The combination of these core adjustments is often where your Lightroom editing style begins to emerge.
3. Sculpt Emotion with the Tone Curve
This is where things get expressive. The Tone Curve is the heart of emotional storytelling in your edits.
Lift the black point slightly for a soft, faded film aesthetic.
Lower the shadows for deep, moody tones with cinematic flair.
Add gentle contrast by creating an “S” curve on the RGB curve.
Use individual Red, Green, and Blue channels for subtle color shifts that give your edit a signature touch.
Mastering the tone curve is like mastering the voice of your Lightroom editing style — subtle but deeply impactful.
4. Customize Colors in the HSL Panel
The Hue, Saturation, and Luminance (HSL) panel allows you to dial in your signature colors. It’s one of the most powerful tools for consistency across your portfolio.
Use it to:
Adjust orange and red hues for natural or stylized skin tones
Subdue greens and blues for a moody, desaturated look
Boost or reduce luminance in specific color zones for harmony
Whether you’re going for vintage film vibes, tropical pop, or Nordic cool tones, this step will bring clarity to your Lightroom editing style.
5. Create & Save Custom Presets
Once you’ve crafted a look you love, save it as a Lightroom preset. This is your blueprint — your visual fingerprint.
Benefits of using presets:
Apply your style with one click across multiple sessions
Speed up your workflow by reducing repetitive steps
Keep a consistent aesthetic across galleries, social media, and client work
🎯 Name your presets based on vibe, scene, or shoot type. Examples: “Golden Hour Soft,” “Studio Crisp,” “Urban Moody,” or “Beach Film Fade.” These become an extension of your Lightroom editing style and make editing faster and more cohesive.
6. Batch Edit for a Uniform Aesthetic
One of the biggest signs of professionalism? Cohesion. Your edits should flow smoothly from image to image within a shoot.
Steps for batch editing:
Choose a key image that best represents the shoot
Apply your preset and fine-tune it
Use the “Sync Settings” feature to apply edits across the batch
Make small image-by-image tweaks as needed
This ensures your Lightroom editing style is consistently applied throughout your portfolio and client galleries.
7. Keep Refining Your Style Over Time
Your Lightroom editing style is not a fixed destination — it’s an evolving journey.
Regularly review your past work. What still resonates? What feels outdated?
Tweak and evolve your presets to reflect new inspirations and editing goals
Stay open to experimenting as your skills grow and trends shift
📸 Pro Insight: Many top photographers evolve their editing style subtly over the years while maintaining a recognizable core look. Flexibility with consistency is the key to a lasting signature style.
Conclusion
Building a unique Lightroom editing style isn’t about copying trends — it’s about developing a look that feels authentic to you. With these 7 powerful steps, you now have a clear path to crafting edits that not only enhance your images but also communicate your artistic vision.
Whether you’re shooting for clients or creating passion projects, your editing style becomes your visual voice — one that people remember, share, and fall in love with.