Shoot in RAW: 7 Powerful Reasons to Edit Like a Pro
If you’re serious about photography and want to unlock the full potential of your images, it’s time to switch from JPEG to RAW. Shooting in RAW format gives you more flexibility and control during editing, helping you achieve professional-level results even if you’re working with a standard DSLR or mirrorless camera.
In this blog, we’ll explore 7 compelling reasons why RAW is the best choice for photographers — along with editing tips that’ll take your shots from decent to dazzling.
1. Unmatched Image Quality
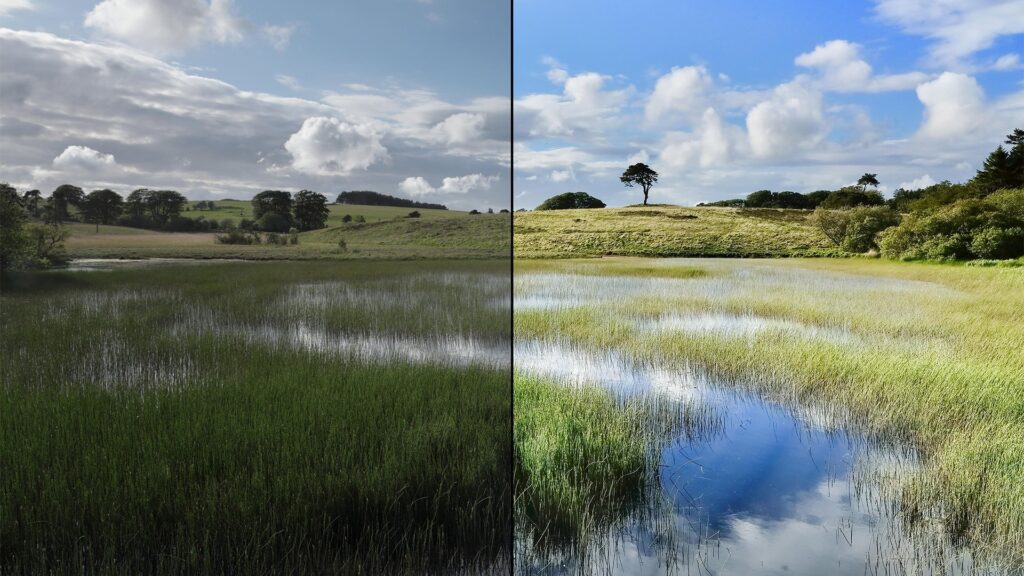
The moment you choose to shoot in RAW, you’re telling your camera to capture all the data from its sensor. JPEGs compress this data to save space, which results in a smaller file—but also sacrifices fine details, color depth, and dynamic range.
RAW files, however:
Preserve every nuance of light and texture
Retain deeper shadow detail and highlight information
Offer a cleaner image with minimal artifacts even after editing
Whether it’s a dimly lit wedding venue, a golden hour portrait, or a cloudy landscape, the image quality you maintain by choosing RAW can’t be matched by JPEGs.
Pro Tip: If you accidentally shoot a photo that’s slightly underexposed or the colors seem off, editing a RAW file allows you to make corrections without reducing image quality. This is a game-changer for photographers who shoot in fast-paced or unpredictable lighting environments.
2. Superior White Balance Control
Imagine this: You take the perfect photo, but your camera misreads the lighting and applies the wrong white balance. With a JPEG, you’re stuck. But when you shoot in RAW, white balance becomes just another adjustable setting in post-processing.
Key advantages include:
Adjusting color temperature and tint accurately
Fixing warm or cool color casts without damage
Retaining true-to-life skin tones and natural lighting moods
In challenging conditions like mixed lighting (e.g., indoors with artificial bulbs + window light), shooting in RAW gives you the flexibility to correct white balance with surgical precision.
3. Better Exposure Recovery
Overexposed skies or underexposed shadows can ruin what might have been a great shot — unless you’re shooting in RAW. Because RAW files store more tonal information than JPEGs, you can recover blown-out highlights and brighten deep shadows with confidence.
Benefits of RAW in exposure correction:
Pull back blown-out areas without introducing gray blocks
Brighten dark shadows without adding unnatural noise
Even out lighting in high-contrast scenes (like sunset silhouettes or backlit portraits)
Pro Tip: Use Lightroom’s “Highlights” and “Shadows” sliders to adjust these zones. With RAW files, you’ll see smoother results and natural gradients that wouldn’t be possible with JPEGs.
4. Non-Destructive Editing Freedom
When you shoot in RAW, you unlock the power of non-destructive editing — meaning your original file stays untouched no matter how many adjustments you make.
You can:
Apply filters, presets, or manual edits without permanently altering the image
Return to your original image at any point in time
Save multiple versions (e.g., color and black & white) from the same RAW file
This gives you the creative confidence to experiment, knowing there’s always a clean version of the photo you can go back to. For professional workflows, it’s not just a benefit — it’s essential.
5. Higher Bit Depth for Richer Colors
Color plays a huge role in the emotional impact of your photos. RAW files usually support 12-bit or 14-bit color depth, while JPEGs are limited to 8-bit.
What this means:
Smoother transitions in gradients and skies
More accurate and flexible color grading
Better compatibility with printing and publishing workflows
This becomes especially important in portrait photography, where subtle color shifts in skin tones can make or break a shot. Shooting in RAW gives you the color fidelity and tonal range necessary for professional results.
6. Precision in Post-Processing
Think of RAW as your digital canvas — and editing software like Lightroom, Photoshop, or Capture One as your paintbrush. Shooting in RAW provides the foundation for detailed and precise editing.
With RAW, you can:
Adjust clarity, sharpness, noise, and contrast at a micro level
Perform skin retouching and selective edits without overdoing it
Correct lens distortion, chromatic aberration, and vignetting effortlessly
This level of control helps you fine-tune your photos for social media, professional portfolios, or print — making your images look polished and intentional.
7. More Control = More Creative Freedom
At the end of the day, photography is an art form — and art thrives on freedom. When you shoot in RAW, you’re not limited by the automatic processing decisions of your camera. Instead, you take the reins.
Apply your unique editing style or preset
Experiment with mood, tone, and color grade
Develop a consistent aesthetic for your brand or portfolio
RAW gives you the space and flexibility to bring your vision to life — whether you’re creating soft, natural portraits or high-contrast dramatic shots.
⚡ Quick & Simple RAW Editing Workflow
Not sure how to get started once you shoot in RAW? Here’s a step-by-step workflow:
Import RAW files into Adobe Lightroom, Camera Raw, or Capture One.
Begin with white balance, exposure, and contrast adjustments.
Use tone curve and clarity/texture/sharpness tools to refine the image.
Apply local adjustments (e.g., spot healing, dodge and burn).
Add creative effects or apply presets for consistent editing style.
Export your final image in JPEG (for web/social) or TIFF (for printing).
Conclusion
Switching to RAW is one of the best upgrades you can make as a photographer. It opens the door to high-level editing, preserves your image quality, and gives you total creative control.
Don’t be intimidated by larger file sizes or slightly longer workflows — the results are absolutely worth it.
So next time you pick up your camera, choose RAW. Your future self (and your portfolio) will thank you.